Monday, August 16, 2010

Text to speech using VSSpeechSynthesizer

The VSSpeechSynthesizer is the text to speech API in the private VoiceServices framework for IPhone OS 4.0. Appearently, it only available for IPhone 3GS or above. As the VoiceServices is not a public framework, application that is dependent on it may not be allow to publish to Apple appstore.

It is quite a powerful API for text to speech, however it is not very well documented as it is in a private framework. To test out the API follow the following steps:

1. Create the VSSpeechSynthesizer.h file and add it into the project.

Code:
#import  <foundation/foundation.h>

@interface VSSpeechSynthesizer : NSObject
{
}

+ (id)availableLanguageCodes;
+ (BOOL)isSystemSpeaking;
- (id)startSpeakingString:(id)string;
- (id)startSpeakingString:(id)string toURL:(id)url;
- (id)startSpeakingString:(id)string toURL:(id)url withLanguageCode:(id)code;
- (float)rate;             // default rate: 1
- (id)setRate:(float)rate;
- (float)pitch;           // default pitch: 0.5
- (id)setPitch:(float)pitch;
- (float)volume;       // default volume: 0.8
- (id)setVolume:(float)volume;
@end

2. Create and initiate the VSSpeechSynthesizer object in the appropiate area of the code.

Code:
VSSpeechSynthesizer *speech = [[NSClassFromString(@"VSSpeechSynthesizer") alloc] init];

3. Adjust the pitch, rate or volume accordingly.

Eg:
[speech setRate:(float)1.0];

4. Create the speech in the appropiate area of the code.

Eg:
[speech startSpeakingString:@"Hello world, how are you"];

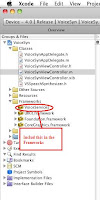
5. Include the private VoiceServices into the frameworks

Eg:

Depending on where you install the IPhone SDK, the location of the VoiceServices framework may varies. Usually the VoiceServices framework is in the following directory:
/Developer/Platforms/iPhoneOS.platform/Developer/SDKs/iPhoneOS4.0.sdk
/System/Library/PrivateFrameworks/VoiceServices.framework/VoiceServices

*Note: The VoiceServies framework only available in the iPhoneOS platform, hence it can only build and run on the actual iPhone device. It can not be run and test on the simulator.


Sample code:

Friday, August 06, 2010

Auto show keyboard

To automatically show the keyboard in any view for a specific UITextField, just set the UITextField as the first responder in the viewDidLoad method.

Eg:
     - (void)viewDidLoad {

               [super viewDidLoad];
              [commentTxt becomeFirstResponder];


    }

Thursday, August 05, 2010

Programming IPhone to support rotation auto orientation change

Everytime when IPhone is rotated the shouldAutorotateToInterfaceOrientation method is called.
To support this, just return YES.

Eg:
       - (BOOL)shouldAutorotateToInterfaceOrientation:(UIInterfaceOrientation)interfaceOrientation {

                  // Return YES for supported orientations
                 return YES;
      }

Friday, June 11, 2010

Audio and Sound

SystemSound API
  • For short sounds only, less than 5 sec
  • for .caf .aif or .wav only
  • No control and immediate playback
      Steps to coding
        1. Register the sound
        2. Play the sound
        3. Optionally can get call back when finished

      Eg:
              NSURL *url = [[NSBundle mainBundle] pathForResource: @"audiofilename" ofType: @"ext"];  
              SystemSoundID id;
              AudioServicesCreateSystemSoundID((CFURLRef)url, &id);
              AudioServicesPlaySystemSound(id);   // to play the sound file

AVAudioPlayer Class
  • High level simple API for playing back long sound (>5sec)
  • Support play, stop, loop, pause, seek
  • Support many more sound formats
     Steps to coding
  • Include the AVFoundation header into the .h file. Eg:
             #import <AVFoundation/AVFoundation.h>

Create AVAudioPlayer from file URL or data, Eg:
             AVAudioPlayer *player;
             NSString *path = [[NSBundle mainBundle] pathForResource: @"audiofilename" ofType: @"ext"];
             NSURL *url = [NSURL fileURLWithPath: path];
             player = [[AVAudioPlayer alloc] initWithContentsOfURL:url error: NULL];

  • Start or stop player as needed. Eg:
             if   (!player.playing) {
                   [player play];
             } else {
                   [player pause];
             }

  • Add AVAudionFoundation Frameworks objects code to the project. Eg:
             In Xcode, under Groups and file Section, Under Frameworks, add ->
            Exsisting Frameworks. Select the AVaudioFoundation.framework to add to the
            Frameworks section.

Wednesday, May 26, 2010

Creating scrollable view

These are the steps for creating an application with scrollable view:
1. Create a scrollable view in the application
  • use either interface builder or code to add a UIScrollView to the current window
  • Sample code to add a scroll view:
            CGRect frame = [CGRectMake(0,0,200,200)];
            UIScrollView* scrollView = [[UIScrollView alloc] initWithFrame:frame];


2. Add subviews (frames may extend beyond the above scroll view bounds)
  • Sample code to add subview:


        UIImage* image = [UIImage withName: @"image.jpg"];  /// image.jpg need to be added to resource
             UIImageView imageView = [[UIImageView alloc] initWithImage:image];
             [scrollView addSubview: imageView];


3. Set the content size
  • sample code to set content size:
             [scrollView setContentSize: [image size]];

4. Set the max zoom and min zoom, if zoom is needed
  • sample code to set min and max zoom:
             [scrollView setMaximumZoomScale: 4.0];
             [scrollView setMinimumZoomScale: 0.1];


5. If zoom is needed, implement the ScrollView's viewForZoomingInScrollView delegate
  • sample code for viewForZoomingInScrollView delegate:
             - (UIView *) viewForZoomingInScrollView: (UIScrollView *) scrollView  {
                       return imageView;
             }
6. Implement all the needed and optional delegate if neccessary.
  • Implement scrollViewDidScroll delegate if need to respond to scroll event
    • sample code:
                          - (void) scrollViewDidScroll: (UIScrollView *)scrollView  {
                              if (scrollView.contentOffset ...) {
                                      // do something here
                                }
                          }
  • Set the scrollViewShouldScrollToTop delegate to change the behaviour
    • sample code:
               - (BOOL) scrollViewShouldScrollToTop: (UIScrollView *) scrollView {
                         // return TRUE or FALSE, depending on view should scroll to top
               }

7. When the view is no more needed, to allow user to return to previous view, send the removeFromSuperview message to the viewController.
    • sample code:
      [self.view removeFromSuperview];

Saturday, May 22, 2010

Creating application with UITabBarController

The diagram shows the layout of a typical IPhone application. Each UI component name is also stated in the diagram. Usually an IPhone application has one UITabBarController. When the tab bar is selected, a specific NavigationController is activated. Each Navigation Controller can be pushed with one or more View Controller. Typically other View Controller can be invoked by linking a button to the method that pop the view controller.


The hierarchy of the UI component is shown in the diagram below:
Nesting Navigation Controllers in UITabBarController
  • Create UITabBarController
                tabBarController =  [[UITabBarController alloc] init];     
               
  • Create each UINavigationController
               UINavigationController *navController1 = [[UINavigationController alloc] init];
               [navController pushViewController: firstViewController animated: NO];
               // .....  create other UINavigationController
  • Add all the UINavigationController / UIViewController to UITabBarController
              tabBarController.viewControllers = [NSArray arrayWithObjects:
                                                                      navController1,
                                                                      navController2,
                                                                      otherViewController,
                                                                      nil ];
             [window addSubView:tabBarController.view];
The above code is typically add to applicationDelegate viewDidFinishLaunchingWithOptions method.

Customizing the UI controller

The Title on the UINavigationController can be customized by changing the viewController.title field in the viewDidLoad method in the view class. Eg:

                      firstView.title = @"First View";  
  • The TabBarItem image and title can be customized by changing the tabBarItem field in navigationController or viewController. Eg: The customization code can be added to the viewDidLoad method of the viewController.
                        UITabBarItem *item = [[UITabBarItem alloc] initWithTitle:@"Playlists"                                                            image: [UIImage imageNamed:@"music.png"]
                                                               tag: 0];
                        self.tabBarItem = item;
                        [item release];
               
  • System item can also be added to the tab bar, Eg:
                  UITabBarItem *item = [[UITabBarItem alloc] initWithTabBarSystemItemItem:    
                                                        UITabBarSystemItemContacts tag:0];                 
                  navigationController.tabBarItem = item;
                  [item release];


Friday, May 21, 2010

Customizing UIBarButtonItem and UIToolbarItem on UINavigationController

There are a bar on the top of the application that has UINavigationController. This top bar is typically known as the navigation bar, it can be customized with rightButtonItem, leftButtonItem and the title.

The bottom bar in the UINavigationController is typically known as tool bar. It can be customized with setToolbarItems using an array of UIBarButtonItem.
 
The following outline the step to customize the navigation bar and tool bar buttons:

1. Usually the best place to add the customization code for adding the UINavigationBarItem and UIToolBarItems is in the viewDidLoad method of the UIViewController.

2. To add the UINavigationBarItem,
    a) First create an UIBarButtonItem
    Eg: the below code implement system button
            UIBarButtonItem *butt = [[UIBarButtonItem alloc]
                                                      initWithBarButtonSystemItem: UIBarButtonSystemItemCarmera  
                                                      target:self action:@selector(action)];
   b) Add the newly created custom button to the navigation bar:
   Eg:
            self.navigationItem.rightBarButtonItem = butt;
             // or [self.navigationItem setRightBarButtonItem:butt animated:YES];

3. If back button is needed in all subsequence pushed viewController (to return to parent view),
    the backBarButtonItem is needed to add to the root navigationController. If the title of the
    backBarButtonItem is not set, the default behaviour is that the back button will be created with
    the title of the parent view.
    **Note: For default behaviour to work, all the viewController must be set with a title.
    Eg:
                UIBarButtonItem *backButt = [[UIBarButtonItem alloc]init];
                 [backButt setTitle:@"Back"];
                 [self.navigationItem setBackBarButtonItem:backButt];

4. To add the UIToolbarItems,
    a) First create all the individual needed UIBarButtonItem
     Eg: Below code create the system's action and compose button, and  a custom information button
           Note: the custom information button does not work in the navigation bar
             UIBarButtonItem *butt1 = [[UIBarButtonItem alloc]
                                                      initWithBarButtonSystemItem:UIBarButtonSystemItemAction
                                                      target:self action:@selector(getInfo:)];

             UIBarButtonItem *butt2 = [[UIBarButtonItem alloc]      
                                                      initWithBarButtonSystemItem:UIBarButtonSystemItemCompose
                                                      target:self action:@selector(getInfo:)];

             /* Below code create other system button, such as Info Button */
             UIButton* infoButton = [UIButton buttonWithType:UIButtonTypeInfoDark];
             [infoButton addTarget:self action:@selector(action)
                               forControlEvents:UIControlEventTouchUpInside];
             UIBarButtonItem *butt3 = [[UIBarButtonItem alloc] initWithCustomView: infoButton];
           
             /***  Below code add a button with image **/
            UIButton* starButt =[UIButton buttonWithType:UIButtonTypeCustom];
           UIImage* buttonImage = [UIImage imageNamed:@"star.png"];
           [starButt addTarget:self action:@selector(getInfo:)        
                           forControlEvents:UIControlEventTouchUpInside];
           [starButt setImage:buttonImage forState:UIControlStateNormal];
           starButt.frame = CGRectMake(0, 0, buttonImage.size.width, buttonImage.size.height);
           UIBarButtonItem *butt4 = [[UIBarButtonItem alloc]initWithCustomView:starButt];
      b) Create an array for all the above created UIBarButtonItems.
        eg.
              NSArray* toolBarItems = [NSArray arrayWithObjects:butt1,butt2,butt3,butt4,nil];
     c)  Release all the create UIBarButtonItems
          eg.
              [toolBarItems makeObjectsPerformSelector:@selector(release)];
      d)  Assign the newly created UIBarButtonItem array to the toolBarItems and set it to not hidden (by
           default it is hidden) :
           eg.
                [self setToolbarItems:toolBarItems animated:YES]; // or self.toolbarItems = toolBarItems;
                [self.navigationController setToolbarHidden:NO]; //or self.navigationController.toolbarHidden= NO;

5. Implement the method to handle when the button is clicked.
    eg.
          - (void)action {
               // ... actual code to implement the action
               // ... when the button is clicked
          }
Wednesday, May 19, 2010

Data flow communication between UIViews

There are many ways for two UIViews to exchange data between them. Below list a few of them:

1. Global variable
    This is the least desire way, though it is probably the easiest way. However, this way is most difficult to
    maintain. With this, it is almost impossible to know which UIViews are related. When changes make to
    one, it is also very difficult to assess which other will be impacted.

2. Message passing
    Public variable can be setup in the UIViews. Setter method can be automatically generated by using the
    @synchronize keyword. The setter method can be invoke to pass the message.
    Eg.
                  UIView.title=@"Testing";

3. Delegate
    Setup delegate interface in the UIView that will be call when there are event changes in the calling 
    UIView.

Saturday, May 15, 2010

Creating an UINavigationController application

A UINavigationController can be added to simple IPhone window application, to create a navigation bar on top of the view as shown in the diagram in the right. The following steps show how UINavigationController can be added to a simple IPhone window application:

1.  Add the UINavigationController object in the header file for the
     applicationDelegate.
     Eg. in ApplicationDelegate.h @interface section:
    UINavigationControoller *uiNavCtrl;

2. Add the following codes to the applicationDelegate.m main class in
    the didFinishedLaunchingWithOptions method.
    Eg.
         uiNavCtrl=[[UINavigationController alloc] init]; 
         [window addSubView: uiNavCtrl.view];   

3. After adding the above codes, UINavigationController has to be release in the dealloc method in the
    applicationDelegate.m main class.
     [uiNavCtrl    release];
    An UINavigationController can have multiple UIViewControllers class pushed into it. If more than one
   UIViewController are pushed into the UINavigationController, the last one that is pushed will be
   displayed, when the application is first launched. A Back button will be automatically created if there are
   more than one UIViewController class are pushed. Steps below outline how to add new
   UIViewController to UINavigationController:

4. If back button is needed in all subsequence pushed viewController (to return to parent view),
    the backBarButtonItem is needed to add to the root navigationController. If the title of the
    backBarButtonItem is not set, the default behaviour is that the back button will be created with
    the title of the parent view.
    **Note: For default behaviour to work, all the viewController must be set with a title.
    Eg:
              UIBarButtonItem *backButt = [[UIBarButtonItem alloc]init];
              [backButt setTitle:@"Back"];
              [self.navigationItem setBackBarButtonItem:backButt];

5. Create a new UIViewController sub-class.

    a) In XCode, under Groups & Files,
        expand current project. Higfhlight Class, right
        click Add->New File... Refer to the
        diagram in the left.
       A new file selection menu will be poped up.
   b) In the new File windows, select UIViewController sub-class.
       Also select with XIB for users interface option. This option
       will generate the XIB file automatically. This XIB is to be used in 
       the interface builder, to simplify the creation of visual control in the
      UIView. If this option is not selected, the XIB file has to be created
      manually later after the class file is generated. This option will
      save two steps of manual work to create the XIB file.
     After that click on the Next button, to proceed to next step of the
     class generation.

  c) In the following new File window, specify the name for the
     UIViewController sub-class that to be created. After that click the
     finish button to generate the class, header and XIB files.
     * Note: As part of the programming convension the class name
        typically start with uppercase character and follow with lowercase
        characters.
    Uppercase first character is also usually used for all the following
    words in the class name.
    Eg. FirstView , SecondView

6. Once the UIViewController sub-class is being generated, the view can be customized according to
    the requirement in the interface builder by clicking the newly created XIB file. The UI control (eg.
    UISlider, UIButton, UILabel... etc) can be added to the view in interface builder.

7. To use the newly created UIViewController in the window application, it has to be pushed to the
    UINavigationController. The best way is to push through the didFinishedLaunchingWithOptions
    method in the applicationDelegate.m main class.  Eg: add the following code to
    didFinishedLaunchingWithOptions in ApplicationDelegate.m, assume that FirstView is newly
    created UIViewController:
                   FirstView *fv = [[UIViewController alloc] init];
                   fv.title = @"Title";  // To add a title to the UIViewController
                  [uiNavCtrl    pushViewController: fv animated: NO];
                  [fv  release];
    *Note: If the animated option is set to YES, the UIView will be shown in a animated way.
    Typically, if it is push through the didFinishedLaunchingWithOptions method, the animation will not show.

8. The newly created UIViewController can also be pushed through any UI controller such as UIButton ...
    etc. IBAction method can be used to push the UIViewController. Eg. The following code show how this
    can be done:
    a) Add IBAction in the FirstView.h
          -(IBAction) getSecondView: (id) sender;
    b) Add IBAction in the FirstView.m in the @interface section:
         -(IBAction) getSecondView: (id) sender  {
                 SecondView *sv = [[SecondView   alloc] init];
                 [self.navigationController   pushViewController: sv animated: YES];
                 [sv release];
         }
    c) Link the UI component change event to the above created IBAction.

Thursday, April 01, 2010

Modifying default UITextField behaviour - Iphone development

1. Create a cancel button in UITextField.
By default, the cancel button is disable when a new UITextField control is added to view. The button can be enabled by changing the option for Clear Button of the UITextField property.

Eg.


2. Disable the clearing old text in UITextField editing.
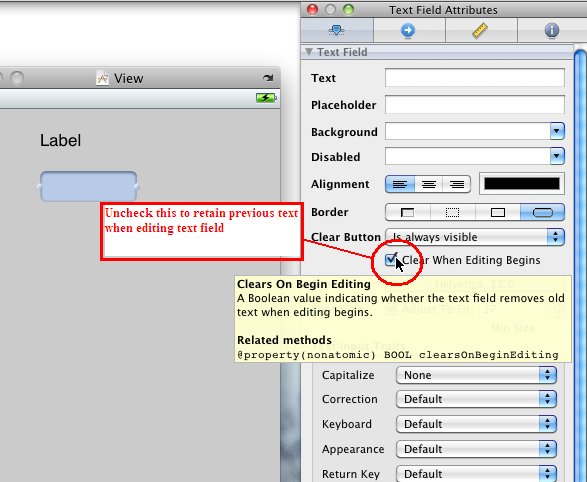
By default, when text is input to the UITextField, any previous entered text will be cleared. This can be disabled by unchecking the clear when editing begins option.
Eg.

Dismiss IPhone keyboard in text field control

By default, IPhone keyboard will not dismiss automatically after user click on the done button or touch other control or view. IPhone developer has to code this behaviour into the control.

The IPhone keyboard will only be dismissed after a resignFirstResponder message is send to the control.
Eg.
                 [textField resignFirstResponder];

There are probably many ways to add this message to the viewController code.  Below show two of them:

1. Implement  the textFieldShouldReturn delegate for the UITextField. Iphone will pass a message to textFieldShouldReturn method when the keyboard's done button is pressed. Call the send the resignFirstResponder message to the active UITextField will dismiss the keyboard. The following section outline the steps to accomplish this:

a)  Add to the viewController.h interface file to specify that it will implement the delegate textFieldShouldReturn method.
Eg.
@interface sampleViewController : UIViewController  
                                                    <UITextFieldDelegate>     
  // add this line to implement textFieldShouldReturn method, when more than one use comma

b) Implement the textFieldShouldReturn method in the .m implement file.
Eg.
-(BOOL)textFieldShouldReturn:(UITextField *)thisTextField  {
    [thisTextField resignFirstResponder];
    // add code to process the input if needed
    return TRUE;
}

c) link the textField to the class that implement the method.
Eg.


2. Override the touchesBegan method. Iphone will send the touchesBegan message when the view is being touched. In the overrided touchesBegan method, send the resignFirstResponder message to the active UITextField will dismiss the keyboard.
Example add the following code to the viewController:
- (void)touchesBegan:(NSSet *)touches withEvent: (UIEvent *)event {
    if( textField.editing) {   // UITextField.editing will return true if it is in the editing mode

       [textField resignFirstResponder];
    }
    [super touchesBegan:touches withEvent:event];     // call the default touchesBegan method
}

Create a new control - IPhone development

1. Create control in view using Interface Builder's Liberary. As shown below:

2. Create outlet in view controller code.
  • In the .h file, define the outlet for the control, example:
             IBOutlet UITextField *textField;   // add this to the @interface section
             @property (nonautomic,retain) UITextField *textField;   // add this outside of the @interface section

  • In the .m code, example:
             @synthesize textField;    //add this into the .m code after the @implement line

3. Link the control in Interface Builder view, to the defined Outlet variable. Example:
4. Now the control, can be used in the code.
    Eg:
                 textField.text = @"hello world";     // to assign hello world to the text field

5. As the textField variable is defined as retain in the .h file, it need to be manually released in the dealloc
    method.
    Eg:
- (void) dealloc  {
   [textField release];   // add this line to manually relase the textField variable
   [super dealloc];
}