Sunday, May 01, 2011

Dynamic object creation

It seem that there are two ways to create object dynamically:
  1. Create from class name
  2. Create from class object
1. Create from class name
    Classes are objects as well in objective C. Hence a classs object can be created using class name. Once   
    a class object is created, an normal object can be created from the class object.
    eg.
               [[NSClassFromString(className) alloc] init...] 

2. Create from class object
    The class object can be created from the typical object by sending the class message to the object. Once
    the class object is created, the typical object can be created from the class object using the typical alloc
    and init way.
    eg.
                Class classForElement = [MyUserClass class];
                id newObject = [[classForElement alloc] init];
                MyUserClass* object = (MyUserClass *) id;

Tuesday, April 26, 2011

Ways to add new view to current view

There are at least 3 ways to add a new view to the current view:
  1. addSubView
  2. pushViewController
  3. presentModalViewController
Below are some comparisons between the above methods:


Feature

addSubView  /
insertSubView

pushViewController

presentModalViewController
Usage
It is typically use to create view heirarchy
programmatically. A view heirarchy will consist of multiple subviews that make up different components in the view.

Each sub view will has its own draw and animation handling.
Each sub view also has its own event handling. Alternatively, view heirarchy can
be created using Interface Builder.
In many IPhone application, the user will need to go through different pages of form / view to complete a specific workflow for a task. Typically, pushViewController is used to step the user through the different pages to complete the task. It is usually work with navigation controller. Push view controller will create the visual effect of push page left to right.In some IPhone application, while performing a task, the user will need to complete a self-contained subtask before he can continue the task. Modal view mechanism can be used to accomplish the subtask function. By default, the present modal viewController will slide a set of controls from bottom to top to the current view. The modal view need to be dismissed before the user can continue with the current view.
Compatibility with navigationController tabBarControllerUsually the subview will be added to the top of the current view, hence cover the navigation bar. The toolbar may also be covered depending on  the size of the subview. The subview can use setFrame to position it below the navigation controller.
Eg:
[self.view setFrame:CGRectMake(0,60,320,400)];
Work well with tabBarController, navigationControllerBoth controllers will be hidden from the modal view. Except for partialCurl transitionStyle. which the NavigationBar will
still be visible.
Return back from the added viewHas to implement return mechanism.Can have automatic back button created
if
the root Controller is navigation controller and the back barButtonItem is created in the root navigation
controller. ** For default back button to work, each
view must has title setted.
Has to implement return mechanism.
Sample code:
Add newViewController
[self.viewController.view
addSubView: newViewController.view];
[self.viewController
pushViewController: newViewController];
[self.viewController
presentModalViewController: newViewController];
Sample code:
Remove
newViewController
[self.view removeFromSuperView];[self.viewController popViewController
Animated: YES];
[self dismissModalViewController
Animated: YES];

Tuesday, April 19, 2011

Creating Modal View

In a typical Windows environment, modal window is a child or popup window where user can not press on any control on the parent window before complete and close the child or popup modal window.

For IPhone or IPad application, modal view behave the same. Sometime it is neccessary to popup a modal view to the user for data entry or other action view which the user has to complete the data entry view before the user can proceed to other part of the application.

The following steps outline how such modal view can be acheived:

1. Create a UIViewController subclass, by New File -> Cocoa   touch -> UIViewController subclass.
    Ensure that the "With XIB for user interface" option is selected.
    eg.  create a UIViewController subclass -> ModalController

2. Use interface builder to create the needed UI in the created ModalController.

3. Add the following modal view invocation code in the appropiate section:

ModalController* modal = [[ModalController alloc] initWithNibName:Nil bundle:Nil];
[modal setModalTransitionStyle:UIModalTransitionStylePartialCurl];  // this will determine how the modal transition in
[modal setModalPresentationStyle:UIModalPresentationFullScreen];  // this will how the modal will be presented
[self.navigationController presentModalViewController:modal animated:YES];

4. Add the following modal view removal code in the appropiate section, eg. link to the exit button of the ModalController:

- (IBAction) backToMain: (id) sender {
    [self dismissModalViewControllerAnimated:YES];
}

Monday, April 18, 2011

Creating application without status bar

The status bar in an iphone application shows the network connections (Telco, WIFI, bluetooth.. etc), date, battery usage, location icon... etc.
For some application, it may be usefull to hide the status bar so that the application has maximum screen area.

To hide the status bar, send the setStatusBarHidden message to the UIApplication object. It should be send in the UIApplication's didFinishLaunchingWithOptions method. This method will be invoked when the application finish launching.

eg.

   - (BOOL)application:(UIApplication *)application didFinishLaunchingWithOptions:(NSDictionary *)
      launchOptions  {
            ..... 
            [[UIApplication sharedApplication]setStatusBarHidden:YES];
            .......
   }

Sunday, April 10, 2011

Creating UITableView

The following steps show how to create UITableView in a iPhone application, it is very similar to the UIPickerView implementation:
1. Create the UITableView in interface builder.
2. Add the IBOutlet for UITableView in the interface (.h) file. (optional, if the UITableView is needed to reference in the code)
3. Link the IBOutlet for UITableView to the UITableView in interface builder. (optional, only if the IBOutlet is created in step2)
4. Implement the following datasource and delegate methods for basic browsing function:
    a.  numberOfRowsInSection datasource method should return the number of row in the table.
        eg.
    - (NSInteger)tableView:(UITableView *) tableView numberOfRowsInSection: (NSInteger)section {
          return [array count];
    }
    b.  cellForRowAtIndexPath datasource method should return a table cell for the row at the indexPath for the table.
        eg.
        - (UITableViewCell *)tableView:(UITableView *)tableView cellForRowAtIndexPath:
          (NSIndexPath *)indexPath {
               UITableViewCell* cell = [tableView dequeueReusableCellWithIdentifier:@"Cell"];    }
               if (cell==NULL) {
                  cell = [[[UITableViewCell alloc] initWithFrame:CGRectZero reuseIdentifier:@"Cell"]
                            autorelease];
              }
             cell.text= [array objectAtIndex:indexPath.row];          // cell.text is deprecated
            return cell;
    }
    c. numberOfSectionsInTableView datasource method should return the number of sections in the UItableView.   
      (Optional, only for multiple section UITableView)
       eg.
          - (NSInteger)numberOfSectionsInTableView:(UITableView *)tableView {
             return numberOfSections;
         }
    d. titleForHeaderInSection datasource method should return the header of the section.
       (Optional, only needed for multiple sections UITableView)
       eg.
       - (NSString *)tableView:(UITableView *)tableView titleForHeaderInSection:(NSInteger)section {
           if (section == 0)   return @"section 1";
           else if (section ==1)   return @"section 2";
           // more code to return header ......
       }
     e. didSelectRowAtIndexPath delegate method would be called if the user selected a row in the UITableView.
        (Optional, only needed if there are actions to be performed when user selected a row)
        eg.
       - (void)tableView:(UITableView *)tableView didSelectRowAtIndexPath:(NSIndexPath *)indexPath {
           // actions to be performed...
           // indexPath.section will give the selected section
           // indexPath.row will give the selected row
           // can implement show detail view....
       }
       f. accessoryTypeForRow delegate method should return the type of accessory (like button, arrow...).
       (Optional, only needed if button or arrow accessory is needed to display at the side)
       eg.
       - (UITableViewCellAccessoryType)tableView:(UITableView *)tableView
          accessoryTypeForRowWithIndexPath:(NSIndexPath *)indexPath {
                //return UITableViewCellAccessoryDetailDisclosureButton;  
               //return UITableViewCellAccessoryDisclosureIndicator;
               
               //return UITableViewCellAccessoryNone;
                //return UITableViewCellAccessoryCheckmark;  
       }
       g. accessoryButtonTappedForRowWithIndexPath delegate method would be invoked when the user clicked on the accessoryButton.
      (Optional, only needed if button in step f is setted)
        eg.
          - (void)tableView:(UITableView *)tableView accessoryButtonTappedForRowWithIndexPath:
            (NSIndexPath *)indexPath {
                 // invoke a method here
                 // eg. [self tableView:tableView didSelectRowAtIndexPath:indexPath];
          }
5. The following steps describe how to implement delete function for UITableView:
    a. Set the tableView into editing mode. There are two ways to set a tableView into editing mode:
        i. tableView.editing property set to YES
        eg.
            tableView.editing = YES;
            // or [tableView setEditing:YES animated:YES]
        ii. If the tableView has implmented with UINavigationController, set the navigationBarButton (left or right) to editButtonItem. This will allow toggle the tableView into editing mode.
        eg.
           self.navigationItem.rightBarButtonItem = self.editButtonItem;
     b. Implement the commitEditingStyle datasource method. This method will be invoked, when a tableView item is deleted.
       eg.
           - (void)tableView:(UITableView *)tableView commitEditingStyle:
             (UITableViewCellEditingStyle)editingStyle forRowAtIndexPath:(NSIndexPath *)indexPath {
               
if (editingStyle == UITableViewCellEditingStyleDelete) { 

                        // ... delete code here ....               
                }
           }
6. Link the UITableView's datasource and delegate to the code that implement the above datasource and   
    delegate methods.

7. The tableView can be set with different background color using the setBackgroundColor method.
     Eg.
[self.tableView setBackgroundColor:[UIColor groupTableViewBackgroundColor]];

Thursday, March 24, 2011

Using static library

To reduce and reuse common code across multiple development projects, the typical development pattern is to use library. Typically library can be static or dynamic, however IPhone development only support static library. The following steps briefly describe how this can be done.
 
1. Create the xcode static library project using the File->New->New Project. Choose Cocoa Touch Static Library, under the Framework and Library tab. Follow through the steps to specify the name and location to complete the static library creation process. Add the source files and header files. Ensure that the project can be build successfully.


2.  In the project that need to use the above created static library, add the static library project file (eg. MyStaticLib.xcodeproj file) by using the Add File to "MyProject" ... menu. Make sure to choose the following option:
  • Uncheck the Destination - Copy files into destination folder (if neccessary) option. This will ensure that the physical files in the static library project is not copied and only the reference to the static library project is created.
  • Select the create group for any added folders option under the Folder selection. **create folder references for any added folders option seem to work as well.
Once the static library project reference is created, the folder structure will be created under the project file as well.


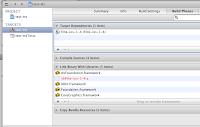
3. Add the static library project into the target dependencies section of the project.
Also add the static library archeive file (eg. libXXX.a) into the Link binary with library section. Make sure that all the iPhone framework (eg. AVFoundation) that is needed by the static library's codes are added to the Link binary with library section as well.

4. The header file for the static library project can be added to the source code in the target project by either of the following way:
  • Use of absolute path to the static library project (eg. import "/user/admin/XXX/xxx.h").
  • Use of relative path to the static library project (eg. import "xxx.h"), but make sure that the absolute path to the static library include files are added to the User header search paths section for the target project's build setting tag under search path section.
Make sure that the target project is recompiled without any library and test the code accordingly.

Sunday, March 20, 2011

Creating UIPickerView

The following steps outline how to create a UIPickerView in an iPhone application.
1. Create the UIPickerView in Interface Builder.
2. Add the IBOutlet for the UIPickerView in the interface file (.h) for the view. Add the @synthesis for the IBOutlet in the objective c code (.m) for the view. (Optional, if the UIPickerView is needed to reference in the code)
eg. in the interface (.h) file
@interface controller : UIViewController {
       IBOutlet UIPickerView *picker;
}
@property (nonatomic, retain) IBOutlet UIPickerView *picker;

eg. in the implementation code (.m) file
@synthesize picker;
3. Link the picker IBOutlet to the UIPickerView in Interface Builder. (optional only if step 2 is followed)
4. The following 1 delegate and 3 datasource methods need to be implemented:
a. numberOfComponentsInPickerView, this datasource method should return the number of components in the UIPickerView. (Optional, only needed for multiple components UIPickerView)
   eg:
   - (NSInteger) numberOfComponentsInPickerView: (UIPickerView *)thePickerView {
         return numberOfComponentsInPickerView;  // this should return the number of components in the UIPickerView
   }
b. numberOfRowsInComponent, this datasource method should return the number of rows in the component.
    eg:
    -(NSInteger)pickerView:(UIPickerView *)thePickerView numberOfRowsInComponent: (NSInteger) component {
          return [componentArray count];
    }
c. titleForRow, this datasource method should return the title of the row in the picker view
    eg:
    -(NString *)pickerView:(UIPickerView *)thePickerView titleForRow:(NSInteger)row forComponent: (NSInteger) component {
          return [componentArray objectAtIndex:row];
    }

d. didSelectRow, this delegated method will be invoked when user select the item in the picker view.
    (Optional, only needed if some action is needed to perform when user select the item on the UIPickerView)
* When there are multiple components in the picker, this method is only called once, when two components are turned together.
    eg:
    -(void)pickerView:(UIPickerView *)thePickerView didSelectRow: (NSInteger)row inComponent: (NSInteger) component  {
          selectedIndex = row;
     }

5. Link the datasource and delegate for the UIPickerView to the delegate implementation in the Interface Builder.

Loading NSArray or NSDictionary with plist file

The content of NSArray and NSDictionary can be loaded from plist file.
The following steps can be used to do that:
1. Create the plist file, by adding new property List file from the resource option.

2. By default, the newly created property list file is of type dictionary <dict>. Change it to array <array> if NSArray is needed. Add in the key and value for dictionary or value for array.

3. The plist file can be loaded to the array using the dictionaryWithContentOfFile or arrayWithContentOfFile method. Typically it is loaded in the viewDidLoad method in the UIViewController.

Eg: For NSDictionary
NSString *path = [[NSBundle mainBundle] pathForResource:@"name" ofType:@"plist"];
NSMutableDictionary *dictionary=[NSMutableDictionary dictionaryWithContentOfFile: path];
Eg: For NSArray
NSString *path = [[NSBundle mainBundle] pathForResource:@"name" ofType:@"plist"];
NSMutableArray *arry=[NSMutableArray arrayWithContentOfFile: path];

4. The writeToFIle method can be used to write back changes to the plist for the array or dictionary object.
Eg: For NSDictionary
[dictionary setVale:value forKey:@"key"];
[dictionary writeToFile: path automatically: YES];